
So now that we have good import data in a CSV file we can start making the changes.
Firstly import the .CSV in the EMS (make sure to use your file name and location in place of C:\tmp\yymmdd.csv).
Import CSV
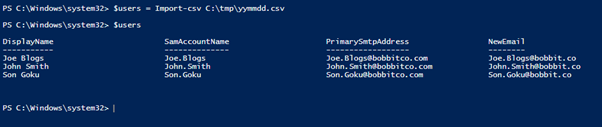
$users = Import-csv C:\tmp\yymmdd.csv
Check the data imported
And check the data imported okay by entering:
$users
And you should see something like this:
Another Common Sense Check (Optional)
In a complex AD environment it may be worth running the following command that lists the users from AD and their OU location. This output can be fed back to the changes initiator to check the users are the right ones. (Imagine an organisation with 10 users named “John Smith” in various sites / departments – by viewing the users AD location OU you can visually check you have the right user). Check the output from the .CSV in excel for duplicate users or users who look like they are in an odd OU.
List AD user OU Location
$users | ForEach-object { Get-ADUser -filter "Name -like '*$($_. Displayname)'" -Properties CanonicalName | select Name, SamAccountName, CanonicalName, DistinguishedName } | Export-Csv c:\tmp\usersOUs.csv
*note this requires the AD powershell module if it doesn’t import automatically then have a look here for the process: http://blogs.msdn.com/b/rkramesh/archive/2012/01/17/how-to-add-active-directory-module-in-powershell-in-windows-7.aspx
Continues on the next page…


Nice work Bobb. Two lines of your code seem to be identical though.
“Add additional SMTP address” and “Set Primary SMTP address and disable email address policy”.
Good spot Dazza!
I’ve fixed “Add additional SMTP address” with the correct command. Thanks for the help.