
Create the Final .CSV file
Now we need to edit the copy of rollback.csv and create a new file that includes the new email address in the fourth column. As shown below this can be done by manually changing the header cell (D1) to “NewEmail” (make sure all the headings are as shown below as they will be used as variables in the following scripts). In cell D2 enter =B2&”@bobbit.co” but replace @bobbit.co with your new email domain. Copy and paste cell D2 into the rest of the cells below so every user has an entry under NewEmail. Which should look like this:

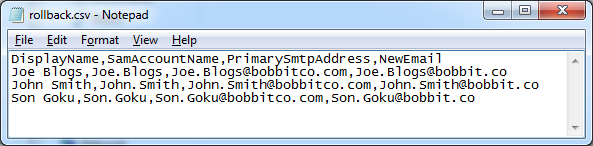
Before saving this file as a .CSV you may want to save it as an excel workbook (which will maintain the formulas in column D) so you can use it as a template for later changes. Then save it as a .CSV (I usually use a reverse date file name format so I know when the .CSV was made i.e. yymmdd.csv). Copy this file to your Exchange server / or Exchange management workstation (I use c:\tmp in the examples below). Open the .CSV in notepad to check the format; it should look similar to this:
On the next page we’ll begin the user email domain renaming process working in Powershell in the EMS.


Nice work Bobb. Two lines of your code seem to be identical though.
“Add additional SMTP address” and “Set Primary SMTP address and disable email address policy”.
Good spot Dazza!
I’ve fixed “Add additional SMTP address” with the correct command. Thanks for the help.